Wednesday, October 26, 2016

Nordic Redwork

I have a new pattern posted, guys.  Phew!  This was a very big project!  But I really like it and I hope you'll enjoy it too.

Nordic Redwork Trio, $7 on Etsy
It's so pretty and classic, and would make a lovely addition to your home this Christmas.  If I wasn't so busy making new patterns, I would definitely make myself a full set of those placemats.  They're awesome!

So what is everyone else up to this week?  I hope it's treating you well!

Tuesday, October 25, 2016

Canvas Tip: Dark on Light

If you're anything like me, the back of your plastic canvas work tends to be pretty messy.  Lots of colors, lots of strings stretching over sections of another color, stopping and starting strings in sections of another color.  That's fine.  After all, you don't see the back of your piece most of the time. 

There is one case where it is a problem, though.  When you're working a dark pattern on a light background.  In that case, you can usually see the dark strings quite clearly through the white, and it makes the light color look dingy and the piece look less polished overall.

I'm working on a pattern right now that's dark red on a white background and I've been having to really restrain myself while stitching, so I figured it would be a perfect time to get some pictures of how I do it.

Here's a picture of the front of the finished piece:


If you look closely, you can see a couple of spots where the red shows through the white where I was less careful (for instance, around the top of the bottom star).  If you're very sloppy with your yarn, you'll have that all over instead of in just a couple of small places.

And here is the back without the white so you can see what I did with the red.


Basically I kept it as compact as possible.  Avoid skipping over to other sections as much as possible.  Finish up a block of color before moving on to another block of color.  Travel under stitches as much as possible to keep the traveling thread from escaping into the unstitched area.  If you're going a long distance between blocks of color, secure the thread and cut it, then start it up again in the new spot. 

I think it works better if you work the light color first and then do the dark color.  The piece I'm working on uses a lot of cross stitching, and I like to lay those down before adding other stitches because it looks more consistent, otherwise I would have tried putting the white down first. 

So I hope this tip helped you out a little!  Does anyone else have any tips on how to stitch dark on light?  Or tips on anything else they're working on right now?

Friday, October 21, 2016

Free Friday: Gingham Pincushion

Today's free pattern is another addition to the gingham sewing set, this time a lovely little pincushion.  I really like the way the blue gingham turned out, but like all the other patterns, you can change out the colors to make any color of gingham you want to match your sewing room.

Gingham Pincushion


Skill Level:

Beginner

Materials:

  • 7-count plastic canvas
  • Red Heart Super Saver yarn in colors listed in key
  • 9-inch piece of white fabric
  • Small amount of poly fiber fill
  • White thread
  • Metal regular mouth canning lid
  • Hot or craft glue
  • #16 plastic canvas needle
  • Sewing needle

Instructions:  

  1. Cut plastic canvas according to graphs. Leaving red section unfinished, stitch pincushion side. Once finished, hold the two narrow ends together, overlapping red sections, and finish stitching.
  2. Using Light Periwinkle yarn, whipstitch bottom piece to side piece. Overcast the unfinished edge.
  3. Cut white fabric into a 9-inch circle. Using white thread and sewing needle, baste ½ inch from the edge all the way around. Hold both ends of thread and pull tight. Before closing piece, firmly stuff with fiber fill to create a ball. Tie or stitch the ball closed.
  4. Insert canning lid into the bottom of stitched pincushion. Place the stuffed fabric ball in next, with stitches facing down. Carefully add hot or craft glue around the inside edges of the pincushion to secure.


Click the image above to see it larger.  You may share this pattern however you please as long as you don't alter it or claim it as your own.  You may sell items made from this pattern.  However, you may not sell this pattern.

I have one more piece planned for this set, so keep tuned!  I don't think I'll post it next week though.  I think I want to do something fall or Thanksgiving themed.

Hope you're all doing well this week!  

Tuesday, October 18, 2016

Canvas Tip: Shaving Your Finished Project

That title sounds a little weird, doesn't it?  Like I'm about to tell you I'm some kind of weirdo that likes shaving things, lol.  Well I am weird, but not without reason!  (And no, small furry creatures don't have to worry about me sneaking up on them and shaving them.)

When I was working on my Fall Welcome Wall Hanging a couple of weeks ago,  I noticed an interesting problem.  Because the piece is so big, I was rubbing the yarn a lot as I worked, and it started to create pills and piles of fuzz.  Normally a piece made with acrylic yarn gets kind of fuzzy as you work on it simply because the yarn is soft, but it's not usually a problem if it's a small piece.  But this big piece I worked on clearly had some issues.

The pilling was especially bad on the dark red section.
It really looked bad.  I like to present my work as professionally as I can, and I just wasn't happy about those ugly fuzzies.  So I thought, well, what can I do?  The only thing I could think of was to get out my husband's electric shaver.


 I used the straight clipper attachment and gently ran it over the piece.  If you're doing this, don't push down!  You don't want to cut the yarn, just clip the fuzzies on the surface. 


As you can see, I actually got a good amount of fuzz off the piece. 


And now it looks pretty darn good!  The picture doesn't really do it justice, but it's a huge improvement.

So there you go!  If you have problems with fuzz or pilling with your project, just shave it!

Monday, October 17, 2016

Cheery Spool Sewing Accessories

Argh!  I've been typing that all morning....  Cheery Spool Sewing Accessories.  There's something about that that's really hard to type fast!

Anyway, the reason I've been typing it all morning is because I finished another cool pattern, and it's up in my Etsy shop!

Cheery Spool Sewing Accessories, $4
This cute set would be perfect for any sewing room.  I'm going to give the model set to my niece for Christmas because I think it would make a great present!  The pattern includes a needle book, a pincushion, and a thread catcher.

The pattern will also be available on Craftsy sometime soon, I hope.  Has anyone else noticed lots of annoying issues with Craftsy lately?  I know they're updating the site, but they seem to be having some serious issues lately.

Anyway, I hope you're all having a lovely day today!

Friday, October 14, 2016

Free Friday: Pumpkin Clip

I don't have kids of my own, but I'm an aunt.  I have three nieces that are either grown or older teens, an 8-year old nephew, and a 3 year old great nephew (yep, I'm a 32 year old great aunt!).  That means I get to do all the cool stuff with kids and none of the hard stuff!

That's what inspired this week's pattern.  Every year, I make up a special bag of Halloween treats for my nephews and nieces.  Usually I buy store bought treat bags, but this year I had a fun idea.  Why not buy some cheap lunch bags and make a cute clip for it?  This idea can be used for all kinds of holidays!  I totally love the brown paper look, so I really love this project.  Plus, it lets me use up some of my plastic canvas scraps. 

 Pumpkin Clip

Skill Level:

 Beginner

Materials:

  • 7-count plastic canvas
  • Yarns in colors listed in key
  • Wooden clothespin
  • Hot glue
  • #16 plastic canvas needle

 Instructions:  

  1. Cut and stitch plastic canvas according to graph.
  2. Overcast stem with brown yarn. Overcast the rest of the pumpkin with orange yarn.
  3. Use hot glue to attach pumpkin to clothespin so that the bottom of the pumpkin is near the opening of the clothespin.

Click the image above to see it larger.  You may share this pattern however you please as long as you don't alter it or claim it as your own.  You may sell items made from this pattern.  However, you may not sell this pattern.

So this concludes my Halloween patterns!  I'll be sharing another pattern from the gingham sewing set next week, this time a pin cushion.  So stay tuned! 

Wednesday, October 12, 2016

Halloween Sale!

Halloween is just around the corner, so I figured what better time to have a sale on my Halloween patterns!  All my spooky Halloween patterns are 50% off at my Etsy shop right now, all are $2 or less.  Here's what's available! 
https://www.etsy.com/listing/463802448/sale-pattern-scary-gravestone-magnets-in
Gravestone Magnets, $1

Candy Corn Tissue Box Cover, $2


Candy Corn Coasters, $2

Halloween Luminaries, $2

The Witch Is In Wall Hanging, $2
 

Eat, Drink, and Be Scary Wall Hanging, $2


 This sale will go on until November 1, 2016. If you get them now, you should be able to get some cool decor made before Halloween gets here!  And if not, you'll have the patterns for next year.  Happy Haunting!

Monday, October 10, 2016

Fall Welcome Wall Hanging

Hey guys, I just finished a really pretty fall welcome sign!

https://www.etsy.com/listing/484431379/pattern-fall-welcome-wall-hanging-in
Fall Welcome Wall Hanging, $4 on Etsy
The picture isn't really that great.  I have trouble getting good pictures of the larger pieces like this one.  It's quite pretty in person though.  I plan on eventually doing the other three seasons in this style and making a cool set.

But for now, I'm totally glad I'm done with this project!  It was a pretty big one.  I think I've been working on it for three weeks now, ugh!  I'm ready to move onto something else.  Actually, I have my next pattern about half done; a pretty sewing set with thread spools on it.  Hopefully you'll get to see those next week sometime!

How was everyone's weekend?  I had a pretty nice one; hubby and I went for a long drive through the country.  The leaves are just starting to peak here in western NY and it's just so pretty.  I hope you're all enjoying your autumn!

Friday, October 7, 2016

Free Friday: Candy Corn Earrings

This week's pattern is one I've been dying to do for a few weeks.  The idea came from my Candy Corn Coasters pattern:


Check them out at my Etsy shop.
The little candy corn on the coaster holder is so darn cute, right?  So I thought, why not make them into earrings?  They're so easy to make and really cute for Halloween!


Candy Corn Earrings


Skill Level: 

Intermediate

Materials:

  • Scrap pieces of 7-count plastic canvas
  • Red Heart Super Saver yarn in colors in key
  • Hot glue
  • Two 8mm gold tone jump rings
  • Two gold tone earring hooks
  • Two sets of jewelry or needle nose pliers

Instructions:

  1. Cut and stitch plastic canvas according to graph.
  2. With hot glue, glue two candies together, wrong sides together. Press pieces firmly together until glue dries.
  3. Use a sturdy pin to pierce a hole through the white section of both candies. Use a small knitting needle or a plastic canvas needle to make the hole larger.
  4. Using pliers to hold earring hook at both top and bottom, twist hook so that the circle at the bottom and the hook at top are perpendicular (if you look at it from above, it forms n X). Repeat with second hook.
  5. Open one jump ring very widely. Holding it with pliers, insert jump ring into the hole in one candy. Make sure ring goes through both layers of candy. Insert earring hook into ring, and then close ring with pliers. Repeat with second candy.
  6. Adjust ring and hook as needed to make it straight and even. Enjoy! ♥ 


Click the image above to see it larger.  You may share this pattern however you please as long as you don't alter it or claim it as your own.  You may sell items made from this pattern.  However, you may not sell this pattern.

I have to be honest, I'm getting a little tired of working on fall projects.  I just finished a big wall hanging yesterday, and I think next week I'm going to start working on something nonseasonal!  Do you guys ever get tired of seasonal stuff like that, or is that just me?  

So with that said, I'm not sure what next week's free pattern will be.  I might have one more Halloween project in me, or maybe I'll get back to the gingham sewing set.  I guess we'll see! 

Tuesday, October 4, 2016

Canvas Tip: Plastic Canvas Ruler

The more I work with plastic canvas, the more ways I find to make it a whole lot easier and faster.  I think my very favorite trick I figured out was to use a plastic canvas ruler, which makes counting all those squares/threads a billion times easier, not to mention more accurate!  Don't you just hate it when you get half way into a project and you find out you counted wrong?  Ugh!

There are commercially available plastic canvas rulers, but they're so easy to make that I decided to make my own.  Plus, mine is a lot sturdier than the ones you can buy online.  Mine is made from a leftover piece of matboard, so it's unlikely to get bent or torn.


As you can see, it's a piece of matboard that I've drawn two lines onto, and then marked off the holes on one side and threads on the other.


To use it, I hold the bottom of my plastic canvas level with the bottom of the ruler.  With the holes side, I see the lines through the holes.  On the thread side, I line up the plastic canvas on the other side of the marked lines, and then I match the lines with the threads.


Then I use my trusty dry erase marker to mark the hole or line I want!  It's that simple.

So here's how you make your own.  If you have matboard, use that!  It's the best material.  If you don't, that's ok!  Take a sheet of cardstock and fold it in half.


Glue the two sides together.  A glue stick works well.


Now draw two lines down the center using a ruler.


For the side that measures holes, line up a sheet of plastic canvas to the bottom of your cardstock on the side of the line opposite of the side you want to measure with (I want to measure on the right side of the line, so I put the canvas on the left side).  Carefully draw one small line next to each hole, making every 10th line longer and numbering them 10, 20, 30, etc.  A sheet of cardstock will measure up to 70 holes, which is usually enough for most projects.


Now do the same thing with the thread side: line up the plastic canvas with the bottom of the cardstock, this time on the same side that you want to be measuring with.  Make a mark that lines up with every thread, with a longer mark for every 10th thread.  Make sure to write next to each side whether it's a hole measure or a thread measure.


Great job!  Now you have a cheap, sturdy plastic canvas ruler!   If you have friends that are into plastic canvas, this would make a great gift, especially if you make it really pretty :)


Do any of you have any other good plastic canvas tips?  Or anything you'd like to know for future Canvas Tip posts? 

Monday, October 3, 2016

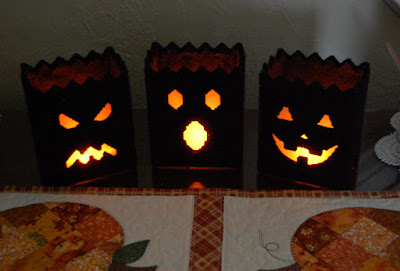
Halloween Luminaries

Hey guys, check out my newest pattern up on Etsy! 

https://www.etsy.com/listing/469400728/pattern-halloween-luminaries-in-plastic
Halloween luminaries pattern, $4 on Etsy

They're adorable and spooky Halloween luminaries for your home.  They're really quick and easy to make up and add a nice touch to your fall decor.

I have one more fall themed project in the works for my shop, and then I'm going to move onto something non-seasonal.  I've been working on fall stuff since August!  Now that autumns finally here, I'm kind of sick of it, lol.  I do plan on posting some fall/Halloween projects for Free Friday though, so stay tuned!

Sunday, October 2, 2016

Haunted House

Ever since I started designing patterns a few months ago, I haven't really had much time to work on my own projects.  Leisure projects.  I don't really mind much, since I'm crafting a lot as a designer and getting cool decor items for my home out of it.  However, sometimes I paw through my patterns and kind of long for the days of working with other people's patterns. 

Back in June, I started a cool plastic canvas haunted house.  It's a pretty big project, so I figured I needed that long to get it done before October.  But then I got distracted with this new designing endeavor, and I set the house aside.  I figured I'd get it done sometime.

Well, October hit me in the face yesterday and reminded me that I hadn't finished the house yet!  So I picked up the needle on Friday and managed to get it all done by Saturday afternoon.  Here's my cool new house!


It was a fun pattern to make!  I didn't even add all the critters to the house; it already seemed really crowded.  The pattern had some mistakes in it, but that's not such a big deal now that I have some experience designing. 

Now I just need to find a place for this thing.  It's so big! 

What are you guys working on these days?  Are you busy making X-mas presents, or are you making cute things for your home?